Growing green peas is one of the most rewarding experiences for a home gardener. There is a profound difference in sweetness and texture between a pea plucked straight from the vine and one that has sat on a supermarket shelf for days.
Whether you have a sprawling allotment or a compact balcony garden, peas are surprisingly versatile and resilient crops. They thrive in cooler weather, making them ideal for the notoriously changeable British climate.
Beyond their delicious taste, peas are a powerhouse of nutrition and beneficial for your garden soil. They belong to the legume family, meaning they work with bacteria to fix nitrogen in the soil, naturally improving fertility for future crops.
This guide explores the science of growing green peas, the different varieties available, and the practical steps to ensure a bountiful harvest.
Overview: The Nutritional and Botanical Profile
Green peas (Pisum sativum) are not just a humble side dish; they are a nutritional heavyweight. According to nutritional data, peas are rich in vitamins K, C, and A, as well as providing a substantial amount of plant-based protein and fibre.
Including peas in your diet can support heart health and digestion. For gardeners, understanding the botany of the pea is just as important as understanding its nutrition. Peas are cool-season crops that stop producing pods once the heat of summer sets in. This makes timing your planting crucial for success.
Gardening is also known to support mental well-being. The act of nurturing a plant from seed to harvest provides a sense of accomplishment and connection to nature, which is vital in our fast-paced world.
Types of Peas: Choosing the Right Variety
Before you sow a single seed, you must decide which type of pea suits your culinary needs and garden space. Broadly, there are three main categories suitable for the UK climate.
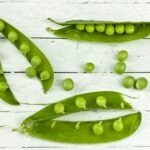
1. Shelling Peas (Garden Peas)
These are the traditional peas where you discard the pod and eat the seeds inside. They are further divided into:
- Early varieties: Sown in early spring for a quick harvest.
- Maincrop varieties: Sown later, taking longer to mature but offering higher yields and sweetness.
2. Mangetout (Snow Peas)
Mangetout literally means “eat all” in French. These produce flat pods that are harvested while the peas inside are barely formed. They are excellent for stir-fries and salads.
3. Sugar Snap Peas
A cross between shelling peas and mangetout, these have thick, crunchy, edible pods with full-size peas inside. They are often the sweetest variety and a favourite for snacking raw.
| Variety Type | Pod Edible? | Days to Maturity | Best For |
|---|---|---|---|
| Shelling | No | 60–70 days | Freezing, Steaming, Soups |
| Mangetout | Yes | 55–65 days | Stir-fries, Raw Salads |
| Sugar Snap | Yes | 60–70 days | Snacking, Light Cooking |
Planting Factors: Soil and Preparation
Success in growing green peas starts beneath the ground. Peas prefer an open, sunny spot with good drainage. While they can tolerate partial shade, full sun promotes vigorous growth and reduces the risk of fungal diseases.
Soil Requirements
Peas thrive in soil with a pH between 6.0 and 7.5. If your soil is too acidic, the plants may struggle to take up nutrients. You can test your soil using a simple kit from a garden centre.
Crucially, peas require well-drained soil. If water logs around the roots, the seeds will rot before they germinate. If you have heavy clay soil, consider digging in organic matter or growing your peas in raised beds.
Nitrogen Fixation:
Peas have a unique relationship with Rhizobium bacteria. These bacteria live in nodules on the pea roots and convert atmospheric nitrogen into a form the plant can use. Because of this, you should avoid using nitrogen-rich fertilisers, which encourage leafy growth at the expense of pods.
When to Plant
In the UK, timing depends on the variety and your location:
- Autumn Sowing: Hardy varieties can be sown in October or November for an early crop the following spring. They will need protection (cloches) over winter.
- Spring Sowing: Sow early varieties from March onwards once the soil has warmed up. Successional sowing (planting a new batch every two weeks) ensures a continuous harvest through early summer.
For precise timing, consult the RHS Grow Your Own calendar.
Treatment and Management: The Sowing Process
Once you have prepared your site, the sowing process is straightforward. However, attention to detail here prevents issues later on.
Direct Sowing Method
- Create a Trench: Use a hoe to make a flat-bottomed trench about 15cm wide and 4cm deep.
- Spacing: Place seeds in two parallel rows within the trench, spacing them about 7–10cm apart. Stagger the seeds so they aren’t directly opposite each other; this gives the roots more room.
- Cover and Water: Cover with soil, firm it down gently, and water well.
The Gutter Pipe Method
A popular trick among British gardeners is sowing peas in a length of guttering filled with compost. This can be kept in a greenhouse until the seedlings are established, protecting them from mice and rotting.
- Fill the gutter with multipurpose compost.
- Sow seeds at the correct spacing.
- Once seedlings are 8–10cm tall, simply slide the entire row of soil and plants out of the gutter into a prepared trench in the garden.
Support Structures
Most peas are climbers. Even dwarf varieties benefit from some support to keep pods off the wet ground.
- Pea Sticks: Use twiggy branches (hazel is traditional) pushed into the ground along the row.
- Netting: Stretch pea netting between sturdy stakes.
- Chicken Wire: Create a tunnel or vertical wall for the tendrils to grab.
Install your supports immediately after planting seeds to avoid disturbing the roots later.
Care and Maintenance
Growing green peas requires consistent, though not labour-intensive, care.
Watering
Peas are thirsty plants, especially when they start to flower. Check the soil moisture daily during dry spells. Water at the base of the plant rather than sprinkling from above to reduce the risk of powdery mildew.
Feeding
Generally, peas do not need extra feeding if the soil was prepared with compost. However, if growth seems stunted on very poor soil, a low-nitrogen fertiliser like liquid seaweed can provide a boost of trace elements.
Weed Control
Keep the area around the base of the plants weed-free. Weeds compete for water and nutrients. Hoe carefully to avoid damaging the shallow roots of the peas.
Troubleshooting: Pests and Diseases
Even the most experienced gardener encounters challenges. Being proactive is the best defence.
Common Pests
- Pea Moth: The larvae bore into the pods and eat the developing peas. To prevent this, cover your crop with insect-proof mesh or horticultural fleece immediately after flowering.
- Mice and Birds: Both love pea seeds. Protect newly sown areas with chicken wire or holly branches. If using the gutter method, keep them in a greenhouse until the plants are less appealing to rodents.
- Slugs and Snails: These are a threat to young seedlings. Use organic slug pellets, wool pellets, or beer traps to manage populations.
Diseases
- Powdery Mildew: A white, dusty coating on leaves, common in late summer or during drought. Ensure good airflow and keep roots moist to prevent it.
- Root Rot: Caused by cold, wet soil. Ensure good drainage and avoid sowing too early if your soil is heavy.
For more on disease management, resources like Gardeners’ World offer extensive advice.
Harvesting: The Reward
Knowing when to pick is the final critical step in growing green peas.
- Mangetout: Harvest when pods are about 7cm long and the peas inside are just starting to swell.
- Sugar Snaps: Harvest when the pod is plump and snaps crisply.
- Shelling Peas: Check the bottom of the plant first (these mature earliest). The pod should be full and round but not bursting. If the pod looks dull or wrinkled, the peas inside may be starchy and over-mature.
Pro Tip: The more you pick, the more the plant will produce. Harvest every 2–3 days to encourage continued flowering.
Practical Tips for Success
- Rotation is Key: Do not grow peas in the same spot two years in a row. Rotate them to a different bed to prevent the build-up of soil-borne diseases.
- Companion Planting: Peas grow well alongside carrots, turnips, and radishes. However, avoid planting them near onions or garlic, as these can inhibit the growth of legumes. For more on this, check The Spruce’s guide to companion planting.
- Preservation: If you have a glut, peas freeze exceptionally well. Blanch them in boiling water for one minute, cool in ice water, dry, and freeze.
- Green Manure: After harvesting, cut the plants off at ground level but leave the roots in the soil. As the roots decompose, they release the fixed nitrogen, benefiting the next crop (usually brassicas like cabbage or broccoli).
The Bottom Line
Growing green peas at home offers a trifecta of benefits: superior flavour, high nutritional value, and improved soil health. While they require some preparation regarding support structures and protection from pests, they are a forgiving crop that provides a high yield for a relatively small space.
By choosing the right variety for your needs—whether it’s the crunch of a sugar snap or the classic taste of a garden pea—and paying attention to soil moisture and harvest times, you can enjoy one of nature’s sweetest vegetables right from your own garden.
Gardening is a journey of patience and learning. Even if your first crop isn’t perfect, the process of tending to life is beneficial for both physical and mental health. So, grab your trowel and get sowing.