Living with chronic lower back pain can be an exhausting, isolating experience. If you are one of the millions of people navigating this condition, you know that finding relief often feels like a full-time job. While medication and physical therapy play vital roles, many are turning to ancient practices for modern relief.
Enter yoga for back pain—a gentle, effective, and scientifically supported method for managing discomfort and improving spinal health.
Whether you have spent years at a desk or are managing an old injury, incorporating specific yoga postures into your routine can strengthen your core, increase flexibility, and help you reclaim your mobility.
In this article, we explore the science behind yoga for back health, provide a detailed guide to the most effective poses, and offer safety tips to ensure your practice supports your recovery.
Understanding Chronic Lower Back Pain
Before diving into the movements, it is essential to understand why yoga for back pain is so effective. Chronic pain is defined as pain that lasts for 12 weeks or longer.
According to the NHS, back pain is the largest single cause of disability in the UK.
The causes are multifaceted:
- Sedentary Lifestyle: Prolonged sitting weakens the glutes and tightens the hip flexors, pulling on the lower back.
- Poor Posture: Slouching compresses the lumbar discs.
- Muscle Imbalance: A weak core forces the back muscles to overcompensate.
- Stress: Psychological stress often manifests as physical tension in the back and shoulders.
How Yoga Helps
Research suggests that yoga is not just about stretching; it is a holistic intervention. A study published by the National Center for Complementary and Integrative Health indicates that yoga can relieve physical pain and reduce the reliance on pain medication.
Here is how it works specifically for the lumbar region:
- Strengthening: It builds the stabilising muscles (transverse abdominis and erector spinae).
- Stretching: It lengthens tight hamstrings and hip flexors that tug on the pelvis.
- Circulation: Movement increases blood flow to soft tissues, speeding up healing.
- Awareness: It improves proprioception (body awareness), helping you correct poor posture throughout the day.
Yoga vs. Traditional Exercise
| Feature | Yoga | Traditional Gym Exercise |
|---|---|---|
| Impact | Low impact; gentle on joints | Often high impact; jarring |
| Focus | Breath, alignment, mindfulness | Repetitions, load, intensity |
| Equipment | Minimal (mat, props) | Machines, weights |
| Mental Benefit | Reduces cortisol (stress hormone) | Endorphin release |
Essential Poses for Lower Back Relief
Below are seven foundational poses designed to alleviate tension.
Note: Always listen to your body. If a pose causes sharp or shooting pain, stop immediately.
1. Cat-Cow (Marjaryasana-Bitilasana)
This dynamic flow is the gold standard for warming up the spine. It lubricates the joints and gently massages the abdominal organs.
How to do it:
- Start on your hands and knees in a tabletop position. Ensure your wrists are under your shoulders and knees under your hips.
- Inhale (Cow): Drop your belly towards the mat, lift your chin and chest, and gaze up towards the ceiling.
- Exhale (Cat): Draw your belly button to your spine and round your back toward the ceiling. The pose should look like a cat stretching.
- Repeat for 1–2 minutes.
Why it works: It brings fluidity to the spine and stretches the torso muscles without putting weight on the back.
2. Child’s Pose (Balasana)
Child’s Pose is a restful, grounding posture that gently stretches the lower back muscles.
How to do it:
- Start on your hands and knees.
- Bring your big toes together and separate your knees to the edges of the mat.
- Sit your hips back onto your heels.
- Walk your hands forward and rest your forehead on the floor.
- Hold for 1–3 minutes, breathing deeply into your back ribs.
Why it works: This pose decompresses the spine, taking pressure off the lumbar discs. For more on restorative practices, you can read more at Healthline.
3. Downward-Facing Dog (Adho Mukha Svanasana)
While often seen as a strengthening pose, this is actually a mild inversion that can elongate the entire back body.
How to do it:
- From tabletop, tuck your toes and lift your hips high.
- Ideally, your body forms an inverted V-shape.
- Modification: Keep your knees bent! The goal is a straight spine, not straight legs. If you straighten your legs and your back rounds, you lose the benefit.
- Press firmly through your hands and hold for 5–10 breaths.
Why it works: It stretches the hamstrings. According to Harvard Health, tight hamstrings are a leading contributor to lower back pain because they limit motion in the pelvis.
4. Sphinx Pose (Salamba Bhujangasana)
This is a gentle backbend that is safer for most people than the more intense Cobra pose.
How to do it:
- Lie on your stomach with your legs extended behind you.
- Place your elbows under your shoulders, forearms parallel to each other.
- Press your forearms into the mat and lift your chest.
- Keep your shoulders relaxed away from your ears.
- Engage your lower belly slightly to protect your lower back.
Why it works: It promotes the natural curvature of the lower back, counteracting the hunching effect of sitting at a computer.
5. Pigeon Pose (Modified / Figure 4)
Traditional Pigeon pose can be intense on the knees. For back pain sufferers, the reclined variation (Figure 4) is often safer and just as effective for releasing tight hips.
How to do it:
- Lie on your back with knees bent and feet flat on the floor.
- Cross your right ankle over your left knee.
- Lift the left foot off the floor and thread your hands around the left thigh.
- Gently pull the left leg toward you until you feel a stretch in the right outer hip.
- Hold for 1 minute, then switch sides.
Why it works: It releases the piriformis muscle. When the piriformis is tight, it can irritate the sciatic nerve, causing pain that radiates through the lower back and legs, a condition detailed by the Mayo Clinic.
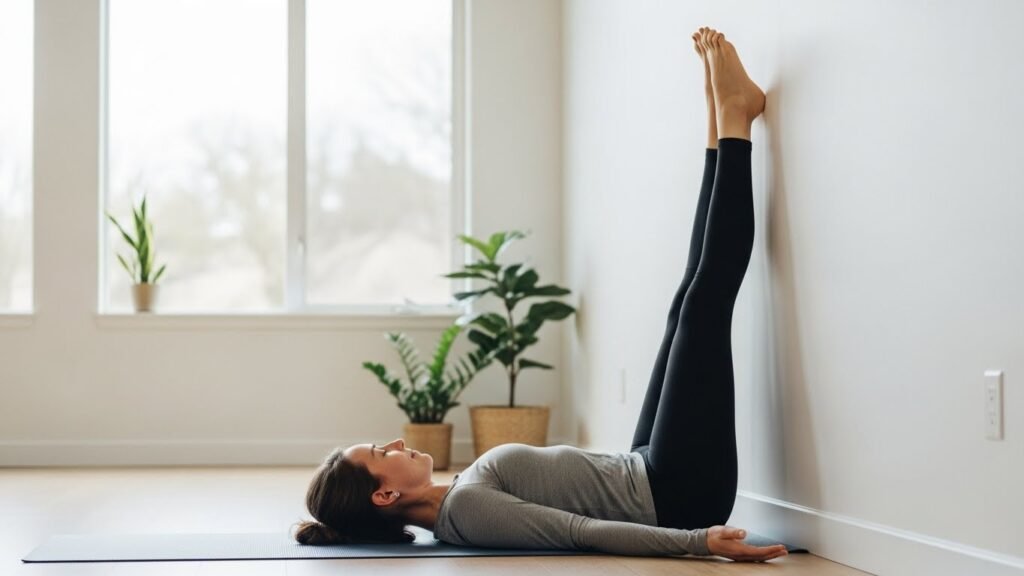
6. Legs-Up-the-Wall (Viparita Karani)
This acts as a reset button for your nervous system and your spine.
How to do it:
- Sit sideways next to a wall.
- Swing your legs up the wall as you lie back.
- Your buttocks should be close to the wall (use a folded blanket under your hips for extra support).
- Relax your arms by your sides and close your eyes.
- Stay here for 5–10 minutes.
Why it works: It completely removes weight from the pelvic girdle and allows the lower back muscles to fully release tension.

7. Supine Spinal Twist (Supta Matsyendrasana)
Twisting is excellent for restoring range of motion, but it must be done gently.
How to do it:
- Lie on your back and hug your knees into your chest.
- Extend your arms out to the sides in a T-shape.
- Slowly drop both knees to the right side.
- Keep your left shoulder grounded on the floor.
- Hold for 1 minute, then switch sides.
Why it works: Rotation hydrates the spinal discs and wrings out tension from the paraspinal muscles.
Safety and Precautions
While yoga for back pain is generally safe, it is not a cure-all for every condition. It is vital to approach your practice with caution.
When to Avoid Yoga
Consult a GP or physiotherapist before starting yoga if you have:
- A recent spinal injury or surgery.
- Spondylolisthesis (instability in the spine).
- Severe osteoporosis.
- Sciatica that worsens with forward bending.
Information from Versus Arthritis suggests that while movement is key, high-impact or extreme ranges of motion during an acute flare-up can be detrimental.
Red Flags
If you experience loss of bladder control, numbness in the saddle area, or weakness in your legs, seek emergency medical attention immediately. These may be signs of Cauda Equina Syndrome, as outlined by Cleveland Clinic.
Practical Tips for Your Routine
To get the most out of your practice, consistency is more important than intensity. Doing 15 minutes of yoga daily is more beneficial than a 90-minute class once a week.
Create a Supportive Environment
- Use Props: Never hesitate to use yoga blocks, straps, or bolsters. They bring the floor closer to you and prevent straining.
- Warm Up: Never stretch cold muscles. A short walk or a warm bath before your session can prepare your tissues.
- Focus on Breath: Deep diaphragmatic breathing stimulates the vagus nerve, which tells your muscles it is safe to relax. Read more about the connection between breath and pain at Johns Hopkins Medicine.
- Listen to your Body: In yoga, we look for “sweet discomfort” (a good stretch), not pain. If you cannot breathe smoothly, you have gone too deep.
Integrating Mindfulness
Back pain often causes anxiety, which in turn tightens muscles, creating a pain cycle. Mindfulness-Based Stress Reduction (MBSR) techniques used in yoga can break this cycle. Research from the National Institutes of Health confirms that mind-body therapies are effective for managing chronic pain.
The Bottom Line
Chronic lower back pain does not have to dictate your life. By incorporating yoga for back pain into your weekly routine, you are taking an active role in your own recovery.
Start slowly with the poses listed above—Child’s Pose, Cat-Cow, and Sphinx are excellent entry points. Remember that the goal is not to perform the perfect pose, but to find a range of motion that heals and strengthens your body.
If you are new to exercise, consider looking for a “Yoga for Back Care” class locally, or consult resources from the British Wheel of Yoga to find a qualified teacher in the UK.
Consistency, patience, and self-compassion are your best tools. Roll out your mat, take a deep breath, and give your back the relief it deserves.